What's new
We're pleased to announce these new features and updates.
December
Update records faster with improved imports
Use our improved import and export functionality to update your existing customer, vendor or product and service records. No longer any need to update records one by one for price changes or contact information.
Simply export all existing records to a spreadsheet (CSV file), make the required changes and then re-import the same file.
-
To export all records, go to the customer, vendor or product and services list. Choose New, then Export all, and follow the steps.
-
To import your updated file, go to the customer, vendor or product and services list. Choose New then Update, and follow the steps.
For more information about import and exporting records, read
Import and export customers and vendors
Import and export products and services
Changes to templates for importing new customers and suppliers
As part of this work, we have also simplified the templates for importing new contact records.
The import contacts CSV file no longer requires a Main Contact type (column N). Imports with this header in the existing CSV files will now fail.
We recommend that you either download the latest version of the template or remove this column from any existing CSV files.
September
Export all records
Easily share data with others using the Export all option
Quickly export customer, supplier, product, or service records. Each export contains all fields for all records except the Analysis Types.
Simply select Export all from the New menu on relevant list.
The export file may take a few minutes to create. Check for a notification on the toolbar to tell you when the file is ready.
Create refunds from bank feeds
To speed up the processing of transactions from bank feeds, when creating new transactions, you can now choose to create a refund.
When you choose the Create a refund link, you can
-
Select income categories, and add a customer (if required), for money out transactions.
-
Select expense categories, and add a vendor (if required), for money in transactions.
2022
November
Calculate the net amount from the gross
We've now made it easier to enter transactions when you only know the gross amount.
Rather than having to workout the amount of tax, just enter the gross amount in the Total field and press Enter. We calculate net and tax for you
You can do this for the following transaction types
-
Other payments
-
Other receipts
-
Sales quick entries
-
Expense quick entries
October
Easily edit reconciled receipts and payments
Ever completed a bank reconciliation and realized you made a mistake?
You can now edit a reconciled payment or receipt. This includes changing the bank account, date, and amount.
Just edit the receipt or payment from the bank activity.
Depending on what you change, we will
-
Unreconcile and update the transaction ready for you to check and reconcile again.
-
Update the starting balance of your next reconciliation to reflect the change.
-
Tell you a receipt or payment has been edited when you check a completed reconciliation.
August
Effortlessly delete reconciled bank transactions
Continuing with our improvements to correcting transactions, you can now delete reconciled bank transactions.
Simply delete the bank transaction in the usual way. We will
-
Display a message to tell you that the transaction is reconciled.
-
Show you that the transaction is deleted when you view the completed bank reconciliation
-
Update the starting balance of your next bank reconciliation to reflect the deleted transaction.
July
Tidy up and gain control of your contacts
Do you have customers and vendors you no longer do business with?
Over time, unused contacts can clutter up your contact list. It can also be difficult to prevent people in your business from creating new transactions for them.
You can now make unused contacts Inactive. Once inactive, we remove them from all selection lists. This ensures that no one can create new transactions for any inactive contacts.
You can also view contacts by status on the Contacts, Customers, and Vendors pages. Select Filter at the top of the list, and then Active, Inactive, or All to change the view.
Find out more about inactive contacts.
Easily correct cleared transactions
We've made correcting cleared transactions quicker and easier.
Now no need to remove the remove the cleared status first. Simply edit or delete a cleared transaction in the usual way.
Find out more about cleared transactions.
Save time when creating transactions
We’ve improved the look and functionality of the Quick Create button. Use this button as a short cut to quickly access the page you need to create the relevant transaction. This saves you time when you're in a hurry and is great for colleagues who are new to Accounting Start.

March
Showing transactions with attachments
Easily check which sales and expense transactions have attachments.
The new Attachments column shows the number of attachments per transaction. This saves you time, as you no longer need to open a transaction to see if it has attachments.
You can find the new column on the Sales Invoices, Sales Credit Notes, Expense Invoices, and Expense Credit Note pages. Select the header to sort the column by number of attachments, which helps you to find transactions.
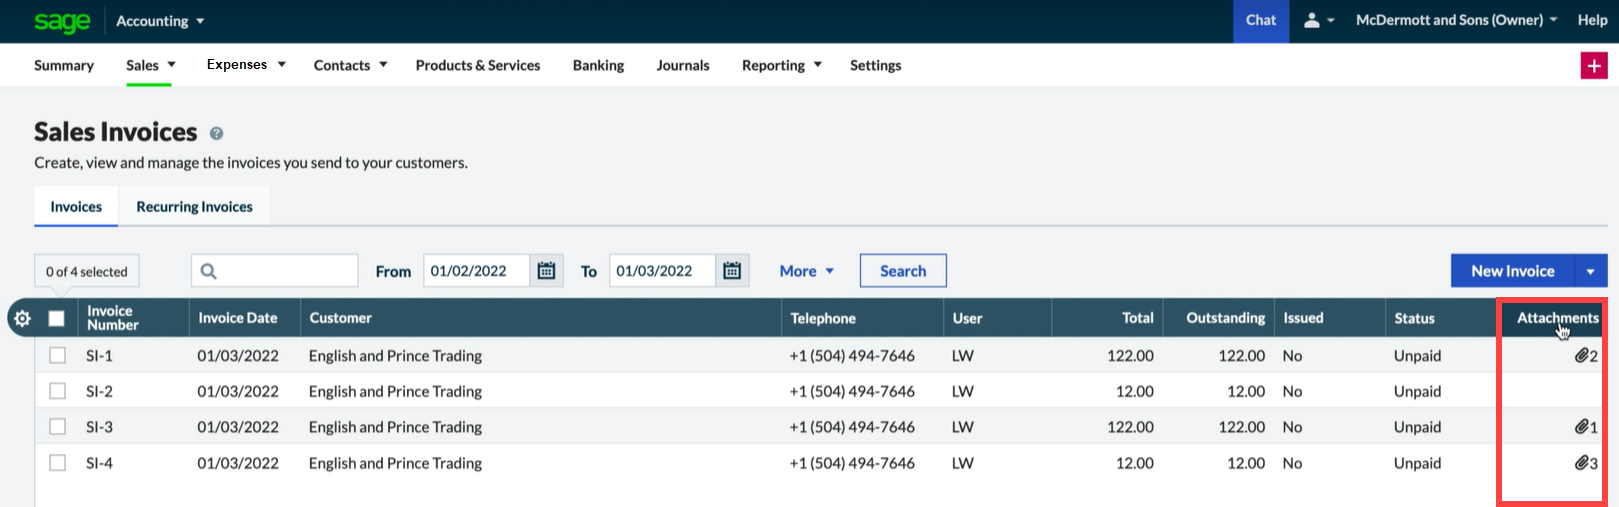
You can use Configure Columns  button (located to the left of the header row) to change the order of the columns. If you don't want to see a column, you can simply remove them from the view.
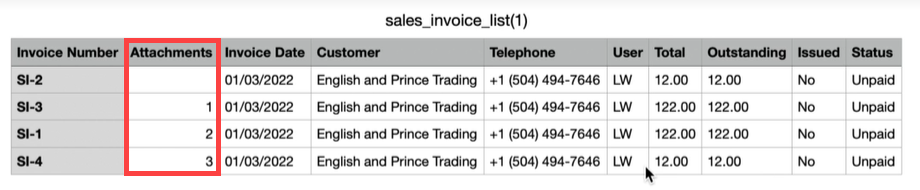
Showing or hiding the Attachments column also affects your exported CSV files. If the column shows and you export to a CSV file, it will include the number of attachments per transaction. If you don't want this, remove the column from the view before exporting.
February
Add attachments to bank transfers
You can now attach supporting documents to bank transfers. With this, you can add:
- Multiple files.
- File types: PDF, GIF, JPG, JPEG, PNG.
- Files up to 2.5MB.
January
Improved bank statement import
If your bank statement fails to import, Accounting Start will now open an error list page. The list includes the transaction number, column, data, and reason for each error. Use this information to go right to an issue, fix it, and get your transactions imported.
Find out more about importing bank statement.

What's new 2021
October
Multi-currency banking
We’ve added to multi-currency banking to make it easier for you to do business in other countries. You can now:
-
Add bank accounts in currencies other than your base currency.
-
Select bank accounts in other currencies when creating transactions.
-
Toggle between currencies when reviewing bank account activity.
-
Revaluate bank accounts, showing gains and losses.
-
Transfer funds between bank accounts with different currencies.
-
Create journal entries for bank accounts in different currencies.
Multi-currency banking is not available for bank feeds and is available only to Sage Accounting Plus subscribers.
Find out more in our guide to multi-currency banking.
Improved Banking automation
We’ve made it easier for you to import bank transactions in the way that suits your business. Plus, save time by applying bank rules to automatically created transactions.
More flexibility importing transactions
Easily import your bank transactions in a way that suits your business. Once your statement has been uploaded you can also:
-
Apply bank rules to transactions to automate the process, saving you time.
-
Bulk delete any duplicate transactions before importing them.
Find out more about Importing a bank statement.
Automate bank rules
Bank rules will automatically categorize and set details on incoming bank transactions with the conditions you choose. You can now:
-
Apply bank rules to bank feeds and imported transactions.
-
Copy and import rules between accounts - no need to recreate them manually.
Find out more about bank rules.
September
Previewing invoices
You can now easily see the effect your changes have on your invoice with the Preview option. You can also preview your invoice if make changes from the Settings page.

August
Logo customization
To ensure your invoice accurately reflect your company's brand, we've simplified the upload and adjustment of logo's when customizing your invoice. We've removed the size limit of 1 MB for logo images and once uploaded, you can easily reposition the image in the preview area or zoom in or out to get it looking just right. You can also reset the image if you need to start over.
Go to Settings, and then select Logo and Templates under Document Preferences to try it out.
![]()
July
Customizing your invoices just got easier
You can now easily access your invoice customization settings – ensuring your invoice to reflects your brand.
May
Easier invoice customization
We've made it easier to access the settings you need to customize an invoice when you're creating a sales invoice.
Whether you want to change your logo and template, or change labels and headings on the invoice itself, we've added handy links allowing you to customize your invoice.
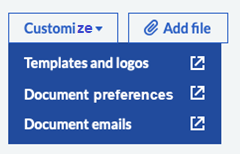
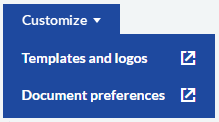
Select an option from the Customize menu at the bottom of the invoice to jump to the related settings.
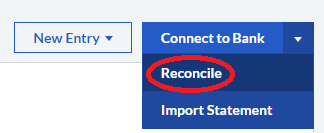
Reconciling bank accounts
To make bank reconciliation easier, we've moved the Reconcile button. To access it, go to Banking and then select a bank account. It is now located to the left of the New Entry button.

Previously, you opened the Connect to Bank (or New Transactions, if you have a bank feed) menu and then selected Reconcile.
March
Inactive bank accounts
You can now mark unused or closed bank accounts as inactive. This allows you to view accounts by status on the Banking page. Select the Active, Inactive, or All tab at the top right-hand corner of the page to change the view. Inactive accounts are also hidden from selection lists when creating transactions. This prevents the posting of new transactions to the inactive account.
For audit purposes, inactive accounts still show in reports and completed transactions.
Search with less information
Find the contact you're looking for with less information. To make life a little bit easier, enter a contact's address (or partial address), their main or mobile phone number, or just their primary name in the Search field on contact lists to find them quickly.
We've also updated the Search field on the Audit Trail report to search by transaction number so you can quickly track down the history of an entry. This comes in handy when you quickly need to find transactions that show on your Tax returns.
Easily improve your documents
To make document customization easier, we've moved document settings to their own section on the Settings page. With this change, we've also renamed some groups to better explain the settings within.
These are the settings groups in the new section with their old and new names:
| Old name | New name |
|---|---|
| Logo & Document Template | Templates and Logos |
| Email Messages | Document Emails |
| Invoice Form Settings | Document Preferences |
Previously, these settings were located in the Invoice & Business Preferences section, which is renamed to Business Preferences.
January
You can now show up to 100 items by default on list pages (such as Sales Invoices) throughout Accounting Start. Go to Settings, Navigation and Data Grids, and then select 100 in the Tables of Data section. You can override this setting as needed by selecting a number in the footer of a list page.
What's new 2020
September
Add attachments to your sales transactions
Now it's easy to attach supporting information such as sales brochures, product images, price lists etc. to your sales invoices, credit notes, quotes and estimates.
- Add multiple attachments.
- Make attachments visible to your customers or for internal use only.
- Supports the following file types: PDF, GIF, JPG, JPEG, PNG.
- File size up to 2.5MB.
For more information, see
- Active bank feeds will now download transactions after you successfully sign in for re-authentication.
- You can now record sales invoice refunds on tax reconciled payments.
August
Tax instalment payments
If you pay your GST/HST or QST tax in instalments, you can set default ledger accounts for the payments. When you enter a payment, Accounting Start will automatically populate the appropriate box on your tax return (110 on a GST/HST return, 210 on a QST return) with the payment amount. As you make more payments through the year, they are added to the total. When you review the tax return, you can adjust the total if needed. This saves you the extra work of tracking your payments elsewhere and manually entering them on your tax returns.
See Setting up taxes for more information.
July
We’ve made these great improvements to the Trial Balance report:
- As of option. You can now run the report “as of” a specific date to get a snapshot of what your ledger account balances were on that date. The report will show data from the start of each account up to the selected date.
- Zero balance accounts option. The new Hide accounts with zero balances option allows you to hide (or show) zero balance ledger accounts on the report.
Unused ledger accounts are never included on the Trial Balance report.
- Retained Earnings breakdown. If you select Summarize retained earnings values, a Retained Earnings line is included on the report. You can now expand the row to see a breakdown of how the summarized amount was calculated. The report splits out the system calculated Profit and Loss values and manual postings to the Retained Earnings account.
For more information, see About the Trial Balance report.
- An issue where some reports got stuck during the calculation process has been fixed.
-
The Trial Balance report now updates as expected after creating credit notes.
June
- When creating journal entries, you can now mark Include on tax return if you want to include the line amount on your tax return. See How journal entries affect the tax return for more information.
- You can now enter expense transactions and other payments for provinces that include GST & PST if you don't have a PST number. This ensures that the PST you’ve been charged is calculated on the transactions.
- The image validation process has been improved when you upload your business or association logos.
May
GIFI support
The General Index of Financial Information (GIFI) is a list of codes defined by the Government of Canada that corporations must use when preparing financial statements. This information is required when corporations file their T2 returns to the Canada Revenue Agency.
Goodbye to spreadsheets
GIFI codes are now included in the default chart of accounts in Accounting Start. If you are setting up a new business, the codes automatically show in the GIFI Code column on the Chart of Accounts page (go to Settings, Chart of Accounts). If you are using custom codes, click the ledger account to open the Edit Ledger Account window where you can edit the code. Alternately, you can also import a chart of accounts that includes GIFI codes.
If you have an existing business, you now have a way to enter GIFI codes. Go to Settings, Chart of Accounts and then click a ledger account to open the Edit Ledger Account window. Enter the code in the GIFI Code field and then save the account. You need to do this only once to automatically include GIFI codes in all of your future financial reports.
Reporting with GIFI codes
With GIFI codes in your chart of accounts, you can show (or hide, if your business is unincorporated) them on the Trial Balance report. Go to Reporting, Trial Balance, and then use the Show GIFI codes option to show or hide them.
From the Trial Balance report page, you can also export a GIFI file. This is helpful if you are using a third-party application for analytics or compliance. Click Export, GIFI to create an *.gfi file in your computer's downloads folder.
-
You can now transfer funds between two Cash bank accounts.
-
The report headings on the Trail Balance report are now included on all pages when you print to PDF.
- The report headings on the Aged Debtors report are now included on all pages when you print to PDF.
April
-
The Trial Balance report no longer fails to print to a PDF if it includes forward balances.
- Invoices with a balance of zero no longer display as overdue.
-
You can now view (but not edit) completed recurring sales invoices.
-
Accounting Start now prevents you from voiding reconciled cheques.
March
You can now import a chart of accounts into a new business that includes ledger numbers with partially recoverable ITCs/ITRs information. See Import chart of accounts for more information.
February
Partially recoverable ITCs/ITRs
Expense transactions
All expense transactions have now been updated to allow for, or to ensure correct accounting of partially recoverable taxes. This includes:
- Vendor Bills
- Vendor Credit Notes
- Other Payments
- Expense Other Receipts
- Quick Entry Vendor Bills
- Quick Entry Vendor Credit Notes
- Import of Expense Quick Entry bills or credit notes (that include a ledger account configured for partially reclaimable tax)
Sales and expense invoices are now calculated the same when GST/QST taxes are included for contacts in Quebec.
January
New tax rates have been added for the sale of vaping products in British Columbia (BC):
- PST 20%
- PST & GST 25%
You can select the new rates for line items on all sales documents (invoices, credit notes, quotes, Quick Entries, estimates, and other receipts).
If your business address is in BC, you can select the new rates on all expense documents (invoices, credit notes, Quick Entries, and other payments).
Where GST is charged on vaping products, the GST % is calculated on the net value plus PST calculated. For example, with a net value of $1000, the calculation is 1000 + 20% PST = 1200 × 5% GST = $60. This method is different to other rates available, where GST is based on net value before calculation of PST.
The following sales tax and payment reports will also show the new BC tax rates:
- Canadian Revenue (CRA)
- Provincial Sales Tax (for BC)
- Sales Day Book
- Expense Day Book
- General Ledger
- Tax Returns
A “tax rates updated” confirmation message no longer displays when you create new invoices.